Set Up Bill From Companies

Set Up Bill From Companies

Set Up Bill From Companies

Before You Use This Article

  • Access needed: Load Manager login and permission to use this screen, report, setting, or workflow.
  • Use this article when: you are using this exact Load Manager feature and have the access listed above.
  • Use a different article when: you are choosing a full setup path for your company instead of using one reference article; start with Freight Brokers, Carriers, Owner-Operators, and Trucking Companies, or Dispatch Services.

Use Bill From Companies when your business needs more than one billing identity in Load Manager, such as a division, DBA, branch, or related company. Each Bill From Company can have its own label, company name, logo, email, address, and carrier or driver terms for supported documents and reports.

When to Use Bill From Companies

  • Use Bill From Companies when different loads should show different billing company information.
  • Use the main Company Info profile when all loads should bill from the same company.
  • Use the customer profile Bill From field when a customer normally bills from the same Bill From Company.
  • Use the load Bill From field when a specific load needs a different billing identity.

Turn On Bill From Companies

  1. Go to Settings.
  2. Click Configuration Options.
  3. Find the Multi-Company Settings section.
  4. Turn on Activate Bill From.
  5. Review any related Bill From settings for carrier or driver reports.
  6. Click Save.

After the setting is turned on, Bill From Companies appears in the Settings submenu.

Open the Bill From Companies List

  1. Go to Settings.
  2. Click Bill From Companies.
  3. Use Search to find an existing Bill From Company, or click Add Bill From Company to create one.

The list includes the Label Name, Company Name, Email, address, phone, and fax information for each Bill From Company.

Load Manager screen example
Customer-specific company names, contacts, addresses, account numbers, and phone/email details are omitted from this public help article.

Set the Main Company as the Default

On the Bill From Companies list, use Set Default "Bill From" as [Company Name] when the main company profile should be the default Bill From option. Leave it unchecked when you want users to choose from the Bill From Companies list instead.

Add or Edit a Bill From Company

  1. Go to Settings > Bill From Companies.
  2. Click Add Bill From Company, or open an existing Bill From Company from the list.
  3. Enter a clear Label Name. This is the name users will recognize in drop-down lists.
  4. Enter the required Company Name.
  5. Upload a Company Logo if this Bill From Company should print its own logo.
  6. Enter the contact, Email, address, phone, and fax information.
  7. Enter MC# / SCAC if that information should appear with this billing identity.
  8. Select CC on all emails if the Bill From Company email address should be copied on related emails.
  9. Click Save.

Load Manager screen example
Customer-specific company names, contacts, addresses, account numbers, and phone/email details are omitted from this public help article.

Use Custom Carrier or Driver Terms

The Bill From Company profile includes a terms area for rate confirmations or dispatch reports. The label changes by TMS type:

  • companies that broker freight: Carrier terms are used for Rate Confirmations.
  • companies that dispatch for carriers: Carrier/Driver terms are used for Dispatch Reports.
  • Carrier or Trucking Company TMS: Driver terms are used for Dispatch Reports.
  1. Open the Bill From Company profile.
  2. Select Use Custom Carrier Terms for Rate Confirmation/Dispatch Report.
  3. Enter the terms that should print for that Bill From Company.
  4. Use Preview Report to review the layout.
  5. Click Save.

Set a Customer's Default Bill From Company

If a customer normally bills from the same Bill From Company, set the default on the customer profile. This helps the correct Bill From Company flow into new loads for that customer.

  1. Go to the Customer tab.
  2. Open the customer profile.
  3. Find the Bill From field in the billing section.
  4. Select the correct Bill From Company.
  5. Click Save.

Select a Bill From Company on a Load

  1. Open an existing load, or create a new load.
  2. Find the Bill From option in the billing area of the load.
  3. Select the Bill From Company for that load.
  4. Click Save.

The selected Bill From Company is used by supported documents, email workflows, and reports that include Bill From information.

Load Manager screen example
Customer-specific company names, contacts, addresses, account numbers, and phone/email details are omitted from this public help article.

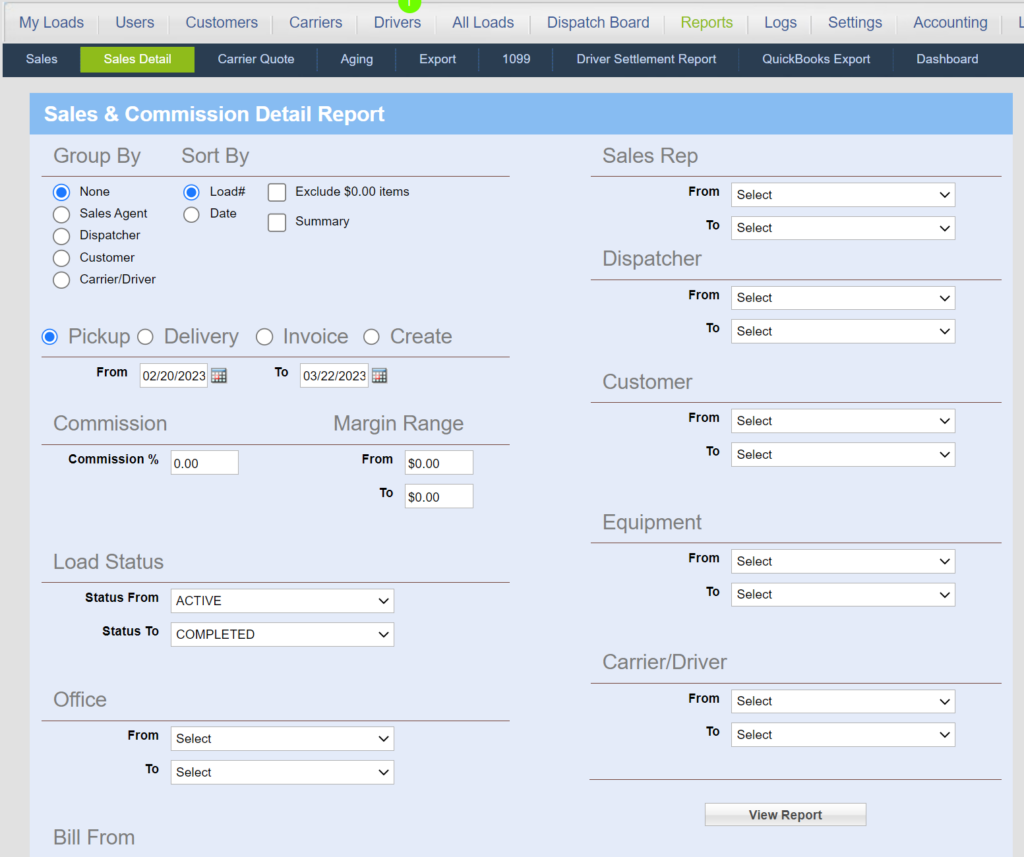
Use Bill From in Sales Detail Reports

The Sales Detail report includes Bill From filters so you can review activity by billing company.

  1. Go to Reports.
  2. Open the Sales Detail report.
  3. Select the date range, status range, and other report options.
  4. Use the Bill From filter when you want the report to include only a specific Bill From range.
  5. Click View Report.

Sales Detail report Bill From filter

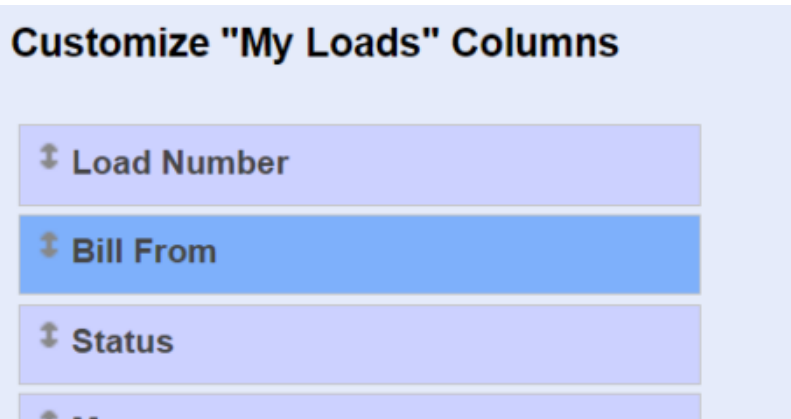
Show Bill From on Load Lists

If your team wants to see Bill From information on load lists, add the Bill From column from Configuration Options.

  1. Go to Settings > Configuration Options.
  2. Find the load list column settings.
  3. Select the Bill From column.
  4. Click Save.
  5. Review My Loads or All Loads to confirm the column is shown.

Bill From column setting in Configuration Options

Troubleshooting

  • Bill From Companies is missing from Settings: Confirm Activate Bill From is turned on in Settings > Configuration Options.
  • A Bill From Company is missing from a drop-down list: Confirm the profile was saved with a company name and email address.
  • The wrong Bill From appears on new loads: Check the customer profile default and the load-level Bill From selection.
  • The wrong terms print on a carrier or driver document: Open the Bill From Company profile and review the custom carrier/driver terms setting.
  • The Bill From column is missing from load lists: Add the Bill From column under Configuration Options and save the load list column settings.

Related Articles

    • Related Articles

    • Generate a Bill of Lading (BOL)

      Generate a Bill of Lading (BOL) Before You Use This Article Access needed: Load Manager login and permission to use this screen, report, setting, or workflow. Use this article when: you are creating, updating, dispatching, documenting, importing, ...
    • Generate a Bill of Lading (BOL)

      Generate a Bill of Lading (BOL) Before You Use This Article Access needed: Load Manager login and permission to use this screen, report, setting, or workflow. Use this article when: you are creating, updating, dispatching, documenting, importing, ...
    • Carriers, Owner-Operators, and Trucking Companies: Start Here

      Carriers, Owner-Operators, and Trucking Companies: Start Here Use this path if your company runs trucks, manages company drivers, works with equipment, or needs driver/mobile dispatch workflows. Premium is not the normal trucking-only package. If ...
    • Set Up Factoring on Customer Invoices

      Set Up Factoring on Customer Invoices Before You Use This Article Access needed: Load Manager login and permission to use this screen, report, setting, or workflow. Use this article when: you are working with billing, customer records, accounting, ...
    • Set Up Company Info and Logo in Load Manager

      Set Up Company Info and Logo in Load Manager Before You Use This Article Access needed: Load Manager login and permission to use this screen, report, setting, or workflow. Use this article when: you are setting up company identity, logo, menu/header ...